Posted by Jane Winston January 25, 2018 17:20
Many people have reported getting "Verification failed - There was an error connecting to iCloud" for one reason or another. To be more specific, they are having trouble signing in or signing out of their iCloud account due to Apple ID verification errors.
Thus, this article focuses on how to fix verification errors on iCloud. You can try the methods below to deal with verification error when signing out of iCloud and other situations. Besides, you can also fix other Apple ID and iCloud issues with these methods.
Situations : When Apple ID verification fails
The validation error does not occur in many different cases. The following are typical situations where verification failed when connecting to the Apple ID server and others. Just read and see if you have a similar experience or not.
- Backup iPhone or iPad manually or automatically.
- Sign in to iCloud on another iDevice.
- Use your new Apple ID to sign in to your iCloud account.
- Restore from iCloud backup files.
- Set up Family Sharing.
During this time, you may see three warnings.
- Validation failed - iCloud connection timed out.
- Validation error - failed to connect to the server.
- Validation failed - Request timed out.
Well, by checking the above points, you can fix the validation error, an unknown error occurred more easily than before. Now just move on to the next paragraphs and find out how to fix validation issues.
Method 1: Re-sign in with your Apple ID on iCloud
The verification may have failed because your Apple ID or password is wrong, so you'd better enter your correct Apple ID and password for a second try.
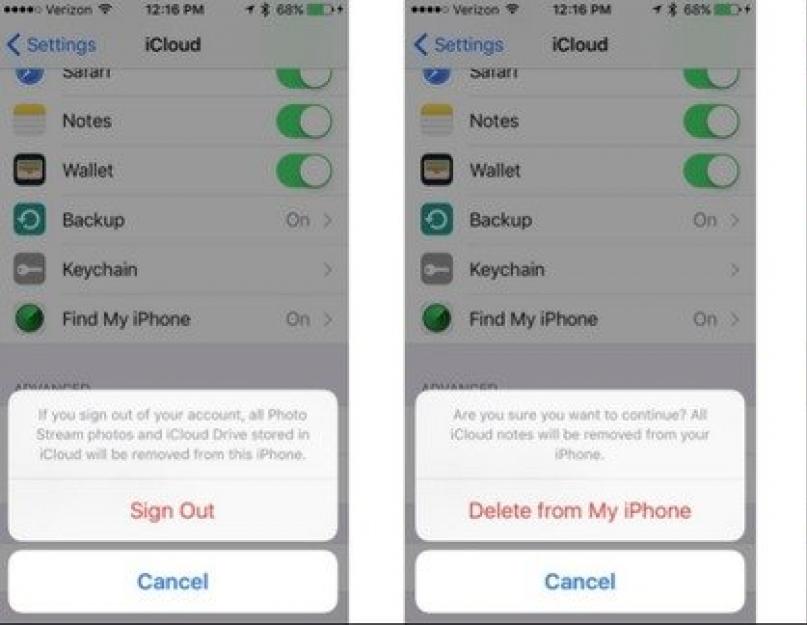
Step 1. Sign out of your iCloud account
Open the Settings app on your iPhone. Select "iCloud" and scroll down to click "Sign Out" at the bottom. Then confirm signing out of your iCloud account and click "Delete from my iPhone (iPad)". Enter your password and click Turn Off to sign out of that iCloud account.
Step 2. Sign in to iCloud again
Select iCloud again in iPhone/iPad settings. Enter the correct Apple ID and password. Finally, click Sign In to re-sign in to your Apple ID on iCloud.

Method 2: Make sure you have a good Wi-Fi network
Everyone knows that iCloud relies on a strong network. Therefore, you should also check the status of your network in order to fix the verification error. This section cannot be completed. The easiest way to test Wi-Fi speed is to watch streaming video. Otherwise, you can join another Wi-Fi network.
Step 1. Open iPhone "Settings" and click "Wi-Fi"
Step 2. Select and connect to another Wi-Fi network

Note. You can use cellular data if you need to verify your Apple ID in iCloud immediately.
Method 3: Reset network settings to fix "Apple ID Verification Failed"
If the Wi-Fi network you are connecting to is in good condition, then you can reset the network settings to fix the Apple ID verification error that did not reveal unknown errors.
Step 1. Reset network settings
Select "General" under your iPhone's "Settings". Scroll down and select Reset. Click "Reset Network Settings" and click "Reset" to confirm reset iPhone.
Step 2 Connect your iPhone to a stable Wi-Fi network
Restart your iPhone and go back to iPhone settings again. Select "Wi-Fi" and enable "Ask to join a network" below. You can now select a Wi-Fi network and enter its password.

Method 4 : Update iOS system
Make sure you have updated your iDevice to the latest version. Otherwise, it may fail and cause Apple ID verification to fail on iPhone and iPad.
Step 1. Locate the software update
Open Settings on your iOS device. Select "General" and select "Software Update" to see if there is an iOS update available.
Step 2 Update your iPhone to the latest version of iOS
Click the "Download and Install" button to update iPhone to iOS 11.2/11.1/11. Make sure the Wi-Fi or cellular network is stable.

Method 5: Disable "iCloud Backup" option
If you can't sign in to iCloud on your new Apple device and get a verification failure message, you need to check if the iCloud backup feature is enabled.
Step 1. Click "iCloud" in iPhone settings
Step 2 Scroll down and select "Backup"
Step 3. Turn off "iCloud Backup" to resolve the Apple ID verification error.

Method 6: Fix verification error with iOS System Recovery
The safest and easiest way to fix iCloud error verification error is to use Apeaksoft iOS System Recovery. This is your ultimate iPhone system recovery software with which you can fix iPhone from various system errors without data loss. So you can safely and quickly rescue your iPhone from app store verification failure, iPhone reset collection reset and other issues.
- Fix iPhone from recovery mode, DFU mode, headphone mode, blue screen and other abnormal situations back to normal.
- Support iOS 11 and iPhone X / 8 Plus / 8 / 7 Plus / 7 / SE / 6S Plus / 6S / 6 Plus / 6 / 5S / 5C / 5 / 4S, iPad and iPod devices
- Offer a secure, clean and easy to use interface.
Step 1, Open iOS System Recovery
Download this program for free on your Windows or Mac computer. Launch it and select "iOS System Recovery" to fix Apple ID code verification error professionally.

Step 2 Connect iPhone to PC
When you define the main interface of iOS System Recovery, you need to connect your iPhone to your computer with a USB cable.

Step 3
Click the "Start" button and follow the on-screen instructions to put your iPhone into DFU mode step by step. As a result, your iPhone or iPad may be completely detected.

Step 4
You can see basic information about your iOS device. Check and correct the wrong part manually. Otherwise, your iPhone will be bricked up during the repair.

Step 5 Download Firmware and Restore iOS System
As soon as you click the "Restore" button, iOS System Recovery will start downloading and fix the validation error automatically.

Are the Apple ID verification issues fixed with the above solutions? If you have any questions or advice, please feel free to contact us. And you can also leave in the comments below.
What to do if Apple iD verification fails?
With the purchase of any "apple" device, you will have to register an Apple ID. This is an indispensable step to use the device. The most common mistakes when creating an apple id. The date of birth has been changed. This data will be required even for a simple download of a free app from the AppStore. There are times when logging in via account does not exceed. What to do in this case?
Apple ID

ID is your account through which you can use Apple services. These include: AppStore, iMessage, iCloud, Apple Music, FaceTime, and more. With this entry, you can turn on the iPhone search function in iCloud and, if you lose your phone, block it remotely.
Same data Apple IDs are used when synchronizing and restoring the device. When you sign up, you get 5 GB of cloudy iCloud storage. You can place backup copies of personal data there for recovery purposes. Login to these services occurs through the password from the account. There are several ways to make such a record.
Read also
Ways to create an Apple ID
Typically, such an account is created the first time you use the device. If you have already used, for example, the iPhone, then when you change the old model to the newest one, you can use the existing ID. The very first step is to create an electrical box. Be sure to use your data and indicate it correctly. In the future, it may be useful for you to return the password from the box (if you forget) then you can confirm that this is your particular electric address.
Create account You can use a computer or directly from the device itself. After specifying the date of birth, apple id, after that when creating the id i. In both cases, a web connection with a good signal and speed is useful. There are two ways to create specifically from a device: by specifying a payment card and by a free method. It is conditionally possible to divide the created accounts into free ones and with an indication of the card number. Card registration is needed in this case if you are going to take software. To do this, open the "settings" icon and find the "iTunes Store, App Store" section. In the expanded area, click "Create an Apple ID".
For free registration, open the AppStore icon. Choose any free application and click the "download" button. An alert will come out with several variations of actions: log in using an existing ID or create a new one. Choose "Create...". Further, the paths of the first method and the second are almost identical. Enter your registration details. Read all terms and conditions and offered information. After you click "accept" you agree to act within their framework.
Answer a few questions (write down the answers somewhere) that will help you recover your account. After that, a message about the payment being made will appear. If you are registering a card, enter its details. If you are using the free method, then click "no". Complete the registration by clicking next. Check your registered email. Open the letter from Apple and follow the instructions. Ready.
The second method involves a PC and iTunes. Here you can also specify a map or not. Open the program and in the workspace on the right, click "iTunes Store" if you specify a map. Date of birth new apple id, but with multiple when created. If not, then go to the store and download the free app and open the menu through it. The next steps are the same. A notification will appear in which you need to click "create ...". Specify all the data, answer questions, read and agree to the terms as described above. Also indicate the card details or click "no". Complete the registration, check your mail, follow the instructions.
How to create an Apple ID (detailed instructions). Creating an Apple ID is easy!
Detailed instructions for creation account Apple ID, which allows you to use all Apple services
Mix - How create Apple ID (detailed instructions). Creating an Apple ID is easy!
I welcome you to my channel, Alex Getch is with you Earlier, I already talked about how to create an Apple ID without credit.
Read also
Can't create an account
Age is a common reason for not registering. You can register an Apple ID only if you are over 13 years old. In this case, this is possible with the consent of the parents (guardians). Full registration is possible at the age of 18. If a younger age was initially indicated (up to 18 years old) and after the refusal the data was replaced with the correct ones, registration will not pass.
For account email addresses cannot be used: [email protected] and [email protected]. @Gmail.com is a good email service. Also, the registration problem may occur due to the use of incorrect characters in the password and login. Password complexity must be respected. Alias "corr_acc_id" isn't found!" when trying to date of birth message when creating a payment. The use of simple combinations and the repetition of characters (three in a row) is not allowed. Consider all these features when registering, and you will be able to register successfully.
What to do if the message “Login Failed. Free Recording Limit Activated"? This happens if you purchase a used gadget. Only a few accounts can be activated on one device, this is programmed by Apple.
Use another iOS device to register. First, log out of the linked Apple ID entry in the settings. Sign up and use your Apple ID on your phone.
Or if you have the opportunity to use a Mac with its system, then you can get rid of this problem through the iCloud settings on your computer. Enter the account details, after that it will be activated, and you can use it on your phone.
Apple ID sign in failure
Validation failure can occur for several reasons. This can be either a software failure of the system or a problem accessing the Apple server (technical work, for example). What to do if such a problem occurs. There are two ways to fix a validation failure.
Passage of activation through iTunes
iTunes can also sometimes "buggy". In order to get rid of the most common mistakes, take the following steps:
Read also
- Make sure that the Internet is working correctly and its speed is high enough for this operation.
- If you have antivirus software, disable it temporarily.
- Update iTunes to the latest version.
- Exit pinned in iTunes account. To do this, in the program at the top left, click the "shop" icon. Select "deauthorize computer". After that, restart your PC. Log in again after enabling.
Skipping ID generation

If you are unable to log in with your account, return to the phone settings window. And they write to me incorrectly, but it turns out you took and created an apple id at (date of birth. In this article I will tell you what to do if the iPhone does not charge, but shows that it is charging, I will describe the causes of this problem. And click on the option “Set up like a new iPhone". In the activation window that opens, click the "Skip this step" item. Confirm your actions by pressing the "skip" key. Complete the rest of the phone activation steps and access the device.
Now, to activate your account, go to the "settings" icon and go through authorization. If for some reason you still cannot log in, check the following parameters:
- Make sure that at the time of authorization, the company's services are available and do not carry out any preventive maintenance.
- Make sure that the date and time are set correctly. If you cannot set the correct parameters automatically, set them manually.
- Check the OS is up to date. Often beta versions can have system bugs.
- Check the functionality of the Internet network. The signal must be good and have a high speed.
- Try logging out of your account and restarting your device. Then log in again.
- Do a factory reset.
Try all the suggested ways to correct for entering the Apple ID. If after all the measures the problem persists, contact an authorized service center for diagnosis and possible repair.
Good time! As I have repeatedly noted, every user of devices from the company from Cupertino must have an Apple ID account. Yes, there should be - simply obliged! However, sometimes already during registration, various errors occur that prevent the creation of this identifier. What to do? Do not register anything and use the device "as is", thereby depriving yourself of the pleasure of using the gadget to its fullest?
The correct answer is no, no, and again no. It is imperative to deal with problems, and today's article is just devoted to why an Apple ID may not be created and, most importantly, what to do in this case. Ready?
Come on, let's go! :)
The most common mistakes when creating an Apple ID
In fact, there are not so many of them, because the process of registering an identifier is quite simple, but these are the most common:
As you can see, almost all errors are due to ordinary inattention. Although there is one more and it is worth talking about it in more detail.
Free account limit activated on this iPhone
A wonderful message that can be found already at the account activation stage. That is, the creation succeeds, but the login still fails. Most often, such an inscription can be seen if someone used the device before you ().

Why is this even happening? Because the "apple" company has set a limit on the number of accounts that can be activated from one iOS device. Why she did this is not clear, but the fact remains - more than three is impossible.
But there is a way out and here's what you need to do:
- If you use a computer with a Mac operating system, then you can fix this in the iCloud settings on the PC itself. Enter your account information - it is successfully activated, now you can use it on your iPhone or iPad.
- Look for another iOS device. As you find, log out of your account on it (settings - iTunes Store, App Store - exit). Enter your data, Apple ID is activated and you can use it already on the gadget where the limit of free accounts was previously reached.
Perhaps these are the main points that may interfere with the creation of an Apple ID. And as a rule, if you take them into account, then everything will go “without a hitch” and will be registered without failures. However, if even after reading you still can’t do it, then write in the comments, we’ll figure it out!
For all Apple services, there is a single account - Apple ID. With it, you can use the following applications: iTunes, iCloud, Apple Music, App Store and some others. Also, with an Apple ID account, you can sync all your devices, use the Find My iPhone service, and other useful features. But, when you try to authorize in the system, you may experience an error related to problems with logging in, device verification, or Apple servers.
Possible errors related to Apple ID
There are several types of errors that can occur when working with an Apple ID:
Error connecting to the Apple ID server - may appear when you try to log into your account through an iPhone, iPad, iPod touch or a computer running Mac OS or Windows.
Firstly, it may arise due to the fact that some technical work is really being carried out on Apple servers, but the chance of this is very small. Most likely the reason is the following:
- In an incorrectly entered login or password;
- outdated firmware version of the device;
- an outdated version of the application through which you are trying to log in;
- inaccurate date and time settings;
- problems related to the Internet;
- it is possible that the error may appear after jailbreaking the device's firmware.
Verification failure - this error occurs when using official applications from Apple - iTunes, App Store, Apple Music, iCloud, etc. The reasons for its occurrence are the same as for the previous error.
Sign in failure or error "This Apple ID is not supported" - this problem occurs when you try to authorize in Apple services and means that you cannot use this application with your Apple ID account. That is, there are some accounts that are not supported by the system, perhaps they are outdated or were registered incorrectly.
Error "Apple ID not found" or "Apple ID is not up to date" - can appear if your account is not up to date or blocked. You may not have verified your account through the email that you received after registration was completed.
Unable to sign in to account due to authentication required notification - occurs on computers if you try to sign in to iTunes or iCloud without having administrator rights.
Troubleshooting (including when connecting to the server)
Before proceeding to individually eliminate each of the possible errors in turn, try the following steps.
Device reboot
Perhaps a simple reboot will solve the problem, as all processes and applications will reboot along with the device and start working correctly. That is, this option is suitable if the error occurs due to the application itself.
Login to your account through the official website
This action is performed in order to find out what is the cause of the error - in the account itself or in the application that cannot be entered. Go to the official Apple ID website (https://appleid.apple.com/en/) and try to sign in with your unique username and password. If the authorization is successful, then the whole thing is in the application, if some kind of failure occurs, then the problem is with the account.
Checking the Health of Apple Servers
If you get an "Error connecting to Apple ID server" notification, then there is a way to check if the servers are really down at the moment, or if the problem is in the account. Let's go to this link
http://www.apple.com/ru/support/systemstatus/ and in the list that opens we find the service that you cannot access. The data is constantly updated automatically and if you see a red cube opposite the selected service, it means that it is not available now, you need to wait a while. If everything is in order with the service, the problem lies in the account.
Checking the health of the Internet connection
Try to open any other application that requires an internet connection and make sure that all pages in it will load. Try reconnecting to Wi-Fi or mobile internet.
Setting the date and time
Applications may not work properly if the date and time settings on the device are incorrect. This is due to the fact that when the Internet is connected between the data stored on the device and the application servers, information is exchanged and security certificates are checked.
- Open the Settings app.
- Go to the "Date and Time" subsection.
- Turn on the “Automatic” function so that the device independently checks and sets the time and date via the Internet.
- If there is no constant access to the Internet, then it is better to go to the "Set the date and time" section.
- And set the settings in it manually, after finding the exact time on any site with the exact data corresponding to your time zone.
Logout
You may need to re-login to your account through the device settings:
- Navigate to the "iTunes and App Store" section.
- Click on your unique Apple ID.
- In the menu that opens, select the "Exit" option.
- Reboot your device.
- Go back to the "iTunes and App Store" section and log in to your account.
IOS operating system update
An error when trying to authorize may occur if your device has a beta version of the firmware installed. It is not necessary to update to the latest IOS 10, but if you are using, for example, IOS 8.0.1 beta, then you should update the system to the version without the beta prefix.
- Open the Settings app.
- Connect to any available Wi-Fi network in advance.
- Go to the "Basic" section.
- Go to the "Software Update" subsection and wait until the end of the process of searching for updates.
- Click the "Install" button.
- We are waiting for the end of the process of loading and updating the system.
Turn off the firewall on the computer
If an error occurs on the computer and you are sure that the Internet connection is stable, then the antivirus can block the application from accessing the network, and because of this, an authorization error occurs.
- Open the antivirus installed on your computer.
- Go to the "Tools" section.
- Open the Firewall add-on.
- In the window that opens, go to the Firewall section.
- We remove the icon in the form of fire opposite the application in which an authorization error occurred.
Application update
The iTunes app on your computer doesn't always update automatically, so sometimes you need to update it manually:
Password reset
Perhaps due to failures on Apple servers, the password from your account has become invalid, that is, it should be restored:

How to fix "This Apple ID is not supported" error
If you have this problem, then for some reason your account cannot interact with Apple services. This is most likely not your fault, so the only thing you can do is contact Apple Support.
- Go to the Apple Support website and click the "Contact Support" button.
- In the "Contact Us" section, click on the "Help" button.
- Go to the Apple ID topic.
- Go to the item "Other sections about the Apple ID".
- Select the "Theme is not listed" option.
- Describe your problem, but most likely the system will not find an answer, so click the "Continue" button.
- Select the method by which you will contact support. When describing your problem, try to describe as accurately as possible what happened and what solutions did not help. Have all the necessary data with you: login, mail to which the account is registered, answers to secret questions, a clear wording of the error that has occurred.
Troubleshooting "Device Authentication Required" error
If this error occurs, you need to log in with an account with administrator rights.
On MacOS

On Windows

Troubleshoot "Apple ID not found" error
The error occurs due to the fact that the account was not confirmed via e-mail, so we find the letter that should have arrived after the end of registration, and follow the link contained in it.
How to avoid problems with your Apple ID in the future
- Always remember the answers to security questions and other additional passwords to restore access to your account. Do not forget to specify a spare mail in your account settings so that if you lose access to the main one, you will not lose access to your Apple ID.
- Make sure that the firmware version of the device and the application through which you are trying to log in are up to date.
- Do not share your account password with anyone, do not enter it on suspicious sites that require it to work.
- Before you solve the error that has arisen, find out what exactly is the reason (in the device, application, account, Apple servers or Internet connection), otherwise you can only make things worse.
When using Apple servers, various errors related to a single Apple ID account may occur, but any of them can be resolved on your own. If for some reason the problem could not be fixed, you can always contact the official Apple support service and get the help of qualified specialists.
21.08.2019
In order to fully use your iPhone, you must create an Apple ID. With this user account, you will be able to use AppStore and iTunes- download paid and free content (games, music, applications). Enjoy a unique service iMessage, which allows you to send and receive free multimedia messages (between Apple users only). Make free audio and video calls to face time.
And of course, use another free service from Apple- iCloud. Thanks to which all your photos, videos, documents, music, applications and other files will be safely stored in the cloud and synchronized across all your devices. Therefore, you will always have access to the files you need. Apple provides 5 free GB for their users. Detailed instructions for setting up iCloud can be found.
Tune Apple ID can be found in phone settings. To do this, select the App Store and iTunes Store item in the settings menu, then create a new Apple ID.
This method is only for those who have a bank card and plans to link it to his account for making purchases in the future, if there is none, then you won't be able to create an ID this way. If you still have a bank card, then you must follow the instructions, indicating your details. Next, you just need to fill out the questionnaire, as described below.

If there is no card, you need to create an account in another way. Absolutely uncomplicated. For this we go directly to the AppStore and select any desired free application and click download? then click "Create a new Apple ID".


After that follows standard registration ID, only card is no longer required. Need to prepare in advance email, which you use, well, or will use on an ongoing basis, you also need to know the email password. Choose a country of your choice (if you choose Belarus, the AppStore will in English, Russia- in Russian), enter your email address and password.
The email address is your Apple Id. The password must contain at least 8 characters, including numbers, uppercase and lowercase letters, while the same character cannot be repeated more than three times in the password, and spaces are not allowed.


Then, to improve security, you need to answer three security questions. It is better to answer them honestly in order to better remember, or, as an option, write it down. They can needed to recover your account.

The backup email field can be left blank. A bank card is not required in this case., mark it with a checkmark.

Item Gift cards iTunes leave blank. Fill in your personal information (last name and first name, zip code and phone number), click next. If you are registering a Russian Apple Id (in order for it to be in Russian), you must specify the Russian postal code and phone number. Not necessarily existing.
Then it is necessary check mail. An email from Apple should be sent to the email address you provided during registration to verify your account. Open this email, click Verify address(Verify now). Enter your Apple ID (which is email) and password. If suddenly there was no letter in the mail, check spam folder.


Apple ID created, now you can go to the AppStore and download whatever your heart desires. The main thing is not to forget the password and security questions. Pleasant use)
When attempting to create an Apple ID for their iPhone or iPad, or attempting to purchase any digital product from iTunes, the user may receive the error message "For assistance, contact iTunes support: www.apple.com/support/itunes/ www. Trying to start getting an ID first leads to a similar result, forcing the user to guess as to why the problem is occurring. In this article, I will explain what this error is, what causes it, and how to fix the “Contact iTunes support for help” error on your PC.
This message looks like this
This problem is international in nature, and is observed in many "Yabloko" around the globe (the English version of the message - "for assistance contact itunes support ..." is found no less regularly).
According to indirect data, the occurrence of this error in most cases is associated with IP filters that are installed by Apple on unreliable IP addresses of individual users (for example, incorrect registration was previously carried out from these IPs with incorrect data entered, there were problems with the payment card and so on).
Also, the cause of this error is a standard failure on the Apple servers, which also sometimes happens.

How to Fix "Contact iTunes Support for Help" Error
A solution to the "contact iTunes support" issue might be as follows:

- Use US data when registering an Apple ID. When the error I'm considering appears, do the following:
- Open the App Store and sign out of your current account. On the "Selection" tab, go to the very bottom, and, tapping on our login, click on "Exit".
- We go to the search tab, we are looking for a free application there, for example, let it be “Youtube”. Click on “Get” (get), in the menu that appears, click on “Create Apple ID”.
- Choose a country United States"(USA). We accept the license agreement by clicking on "Agree".
Enter data for registration:
- Email(Email). Here it is better to choose the world mail services, let it be Gmail.com (mail from Google).
- Password(password) - a combination of Latin letters, numbers, and a special character;
- security info(security information) - here you need to specify secret questions and answers to them (remember both, they may be needed when recovering your password);
- Specify the date of birth(better than your own or a loved one, so as not to forget if you need to recover your password)
- In the column " billing information” (information on billing) select the payment method “None”, and tap on “Next”.
Now you need to enter a real US address and phone number. It is better to take some real address from the state of Florida (there are no taxes on purchases made in the "App Store").
Enter the following details, all in English:
- Street (street);
- City (city), for example "Tampa";
- State (state) - FL (Florida);
- Zip Code (index) - Florida has 32830;
- Area code (city code) - for Tampa it is 813;
- Phone (telephone) - the last ten digits are needed.
This data can be taken, for example, by searching Google Maps for some object with the specified data (hotel, university, or something else like that).
After entering these details, you will be taken to the verification screen. Check the email you provided earlier and follow the link from Apple's confirmation email. If your application (in this case "YouTube") starts loading, it will mean that the Apple ID has been successfully created.
Conclusion
In this article, I have reviewed the error “Contact iTunes support for help”, and various options for solving it. I recommend that you try the method of obtaining an Apple ID, which I described above, change your IP, and also contact Apple support, which will try to help you fix the dysfunction described above.
In contact with
With the purchase of any "apple" gadget, you will have to register an Apple ID. This is a required step to use the device. This data will be needed even if you simply download a free app from the AppStore. There are times when you can't sign in with your account. What to do in this case?
ID is your account through which you can use Apple services. These include: AppStore, iMessage, iCloud, Apple Music, FaceTime, and more. With this entry, you can turn on the iPhone search function in iCloud and, if you lose your phone, block it remotely.
Also, Apple ID data is used when synchronizing and restoring the device. When you sign up, you get 5 GB of iCloud storage. You can place backup copies of personal data there for recovery purposes. Login to these services occurs through the password from the account. There are several ways to create such a record.
Ways to create an Apple ID
Typically, such an account is created the first time you use the gadget. If you have already used, for example, an iPhone, then when you change the old model to a new one, you can use an existing ID. The very first step is to create an email account. Be sure to use your data and enter it correctly. In the future, you may need to recover the password from the box (if you forget) and then you can confirm that this is your email address.
You can create an account using a computer or directly from the device itself. In both cases, you will need an internet connection with a good signal and speed. There are two ways to create directly from the gadget: by specifying a payment card and in a free way. It is conditionally possible to divide the created accounts into free ones and with an indication of the card number. Card registration is required if you are going to buy software. To do this, open the "settings" icon and find the "iTunes Store, App Store" section. In the expanded area, click "Create an Apple ID".
For free registration, open the AppStore icon. Choose any free application and click the "download" button. An alert will appear with several options for action: log in using an existing ID or create a new one. Choose "Create...". Further, the paths of the first method and the second are almost identical. Enter your registration details. Read all terms and conditions and offered information. After you click "accept" you agree to act within their framework.
Answer a few questions (write down the answers somewhere) that will help you recover your account. After that, a message about the payment being made will appear. If you are registering a card, enter its details. If you are using the free method, then click "no". Complete the registration by clicking next. Check your registered email. Open the letter from Apple and follow the instructions. Ready.
The second method involves a PC and iTunes. Here you can also specify a map or not. Open the program and in the workspace on the right, click "iTunes Store" if you specify a map. If not, then go to the store and download the free app and open the menu through it. The next steps are the same. A notification will appear in which you need to click "create ...". Specify all the data, answer questions, read and agree to the terms as described above. Also indicate the card details or click "no". Complete the registration, check your mail, follow the instructions.
Can't create an account
Age is a common reason for not registering. You can register an Apple ID only if you are over 13 years old. In this case, this is possible with the consent of the parents (guardians). Full registration is possible at the age of 18. If a younger age was initially indicated (up to 18 years old) and after the refusal the data was replaced with the correct ones, registration will not pass.

Account cannot use email addresses: [email protected] and [email protected]. @Gmail.com is a good email service. Also, the registration problem may occur due to the use of incorrect characters in the password and login. Password complexity must be respected. The use of simple combinations and the repetition of characters (three in a row) is not allowed. Consider all these features when registering, and you will be able to register successfully.
What to do if the message “Login Failed. Free Recording Limit Activated"? This happens if you purchase a used gadget. Only a few accounts can be activated on one device, this is programmed by Apple.
Use another iOS device to register. First, log out of the linked Apple ID entry in the settings. Sign up and use your Apple ID on your phone.
Or if you have the opportunity to use a Mac with its system, then you can get rid of this problem through the iCloud settings on your computer. Enter the account details, after that it will be activated, and you can use it on your phone.
Apple ID sign in failure
Validation failure can occur for several reasons. This can be either a software failure of the system or a problem accessing the Apple server (technical work, for example). What to do if such a problem occurs. There are two ways to fix a validation failure.
Passage of activation through iTunes
iTunes can also sometimes "buggy". In order to get rid of the most common mistakes, take the following steps:
- Make sure that the Internet is working correctly and its speed is high enough for this operation.
- If you have antivirus software, disable it temporarily.
- Update iTunes to the latest version.
- Sign out of your pinned iTunes account. To do this, in the program at the top left, click the "shop" icon. Select "deauthorize computer". After that, restart your PC. Log in again after enabling.
Skipping ID generation

If you are unable to log in with your account, return to the phone settings window. And click on the "Set up as new iPhone" option. In the activation window that opens, click the "Skip this step" item. Confirm your actions by pressing the "skip" key. Complete the rest of the phone activation steps and access the device.
Now, to activate your account, go to the "settings" icon and go through authorization. If for some reason you still cannot log in, check the following parameters:
- Make sure that at the time of authorization, the company's services are available and do not carry out any preventive maintenance.
- Make sure the date and time are set correctly. If you cannot set the correct parameters automatically, set them manually.
- Check the OS is up to date. Often beta versions can have system bugs.
- Check the functionality of the Internet network. The signal must be good and have a high speed.
- Try logging out of your account and restarting your device. Then log in again.
- Do a factory reset.
Try all the suggested ways to correct for entering the Apple ID. If after all the measures the problem persists, contact an authorized service center for diagnosis and possible repair.
Creating an account on the iPhone is one of the most important manipulations for every owner of an Apple smartphone. Only with your own ID will you be able to enjoy the full range of functions of this device. In addition, performing important operations such as setting up security or syncing with iCloud will require verification with an Apple ID. With your Apple ID, you can make purchases, download content, and use the Find My iPhone feature.
Usually, an Apple ID is created on the phone the first time you use the gadget. If you are upgrading to a newer model, you can link your new iPhone to an existing account. But if you are using gadgets from an American company for the first time, you will need to go through full registration. Before you change your Apple ID to a new one, you need to create a mailbox. Best of all, if you need to create an Apple ID account, you will use a separate, newly created email address.
Data, during the initial authorization on the official website, you need to enter the real ones, so that if necessary you have the opportunity to restore access. In addition, truthful information about you will be required during the subsequent account setup. Therefore, be extremely careful and try not to make mistakes when entering account information.
Create an account using iPhone
Apple company accounts can be created directly from your iPhone. To do this, there are two options - go through a standard registration, in which you need to specify information from your bank cards to make payments, or create an Apple ID without a credit card. Up-to-date billing information will be required if you purchase any software from the AppStore. If you do not plan to make purchases and do not want to do it by accident, for example, by mistake. We recommend using the second, more sophisticated, method.

The standard procedure is as follows: you need to open the iTunes Store, App Store tab and find the “Create a new Apple ID” item there.
If you want to register an Apple ID without payment cards and for free, proceed as follows:
- Go to the App Store.
- Select a game or application that is offered for free.
- Download and wait for it to install on your iPhone.
- The next step is to enter an existing account or start a completely new one. When prompted, select "create a new ID".
After that, the steps are similar in both options:
- If you do not want to link the card, for one reason or another, it is better to set Russia as a country, even if you live in another state - this will give a wider choice of applications, programs and other things.
- After that, you need to carefully read and accept the standard user agreement.
- Then personal data is entered. When specifying an existing email address and password, be careful - for security reasons, the password must consist of at least eight characters, have letters in both cases.
- When specifying an age, please note that you cannot enter less than 13 years, and if you enter less than 18, access to the content will be restricted.
- The answers that you will enter to security questions are best saved in a text file or written down on paper and hidden. This is done in order to quickly and safely restore access to your account if necessary.
- If you are registering in the first way, then you will need to enter payment information.
- Procedure completed.

After that, you need to go to the mailbox that was used to create the account. It should receive a letter from technical support, confirming the creation of an Apple ID. For the first registration of apple id to be quick and correct, just click on the highlighted link with the text of the letter.
iTunes to the rescue
Alternatively, an account for an iPhone or iPad can be issued using the official iTunes program. In this scenario, you will be able to choose whether to indicate information about your cards or not. Before you change the ID, you need to go to the menu and find the iTunes Store item there. If you want to learn how to create an Apple ID without payment information, as in the first case, you need to download any free application and go to this menu using it.

After this, the actions are standard in both cases:
- The system will offer to log in to a newly created, existing account or create a new one.
- After selecting the option to create a new one, enter your details. As stated earlier, they must be true so that you can confirm their authenticity.
- After that, you will have to answer security questions (it is better to write down the answers) and enter your card details or refuse it if you want to create an Apple ID without a credit card.
- After completing the registration, be sure to go to the mailbox and immediately confirm the creation in the mail, using the highlighted link in the body of the letter.
If a letter from those. support does not come for a long time, check your spam folders and filtered emails in other categories - often emails arrive there by mistake.
What mistakes can be made?
To learn how to register an ID on an iPhone correctly, how to change an ID on a device, you need to know what mistakes to avoid. Most often, the following difficulties arise in the process:
- You don't want to make purchases from the App Store. In order not to even accidentally buy any paid content without providing bank card details.
- It is best to indicate the real age, but only if it is more than 13, and preferably more than 18 years. If you set the age to 12 years or less, the system will simply not let you create your Apple ID. And if you specify an age of less than 18, you will not get access to all content.
- If you managed to get mail with an address on @iCloud.com or @me.com, you will have to create a new box to register an account for an iPhone. These addresses are not suitable for creating accounts.
- If the name you entered contains invalid characters, please note that there are no Russian letters in the mail address, and there are no extra characters, dots, numbers, etc. in the name and surname.
- The password must be complex. With a password that is too simple, the system will not allow you to complete the process to the end. Numbers, uppercase and lowercase letters, symbols - the more of them in the password, the better.
- An obstacle in creating an ID on an iPhone can be a server failure. In this case, it is best to wait and continue in half an hour - an hour, when the servers will be up and running.
In general, registering a new Apple ID does not take much time. Even an inexperienced user will be able to carry out this operation if he acts according to the instructions.
We will tell you how to set up and manage your Apple ID in the next article, stay tuned.

Conclusion
You already understood that creating an account for iphone is no more difficult than getting an e-mail. You need to delve into the essence of the process further, mechanically fill in the necessary fields. Registration does not take a lot of time, so in 20 minutes you will be able to use smartphones as a full owner of a smart device capable of many amazing things.
Video instruction
Getting an account from Apple is the first task of any owner of an iOS device. And it is better to do it immediately after its purchase. Without an ID number, it will not be possible to use the functionality of an iPhone or iPad at 100%. If you want to purchase software in the AppStore or reflash your gadget, all these tasks will require ID verification. This number will allow you to activate the search option, and if you lose your device, you can easily find it. The same function will help you put a block on your gadget if it is stolen.
But the most attractive thing about owning an ID is the ability to download hundreds of applications for free from the Apple store. Anyone here will find software to their liking. Programs are presented in a wide variety of categories - for work, entertainment, leisure ...
In the "cloud" you will have access to 5 GB of space. All copies of your device data will also be stored here. And if you set up automatic backup, they will be generated daily.
As a rule, an account is created during the very first launch of an iOS device. But if you prefer the representative of the sixth line to the old iPhone model, tie it to the current number.
To start registration, create a new e-mail intended for this purpose. All data must be entered correctly so that in case of problems when you need to put a block on the gadget or remove it, you can easily remember everything.
Next, let's talk about the various options for creating an account. This operation is performed both from a PC / laptop through the well-known iTunes application, and through the device itself. Both methods do not require much effort and time. Read on for the steps to follow for each.
Here it is possible to pass the usual registration with the indication of the bank code number and without it. It is necessary to indicate payment data for those who plan to purchase many different products in the AppStore. If you do not need this, feel free to choose the second path.
In any case, you will have to go through the following steps to create an account:
- In the usual situation with a card, go to the iTunes Store section and select the item to create a new ID. If for some reason you absolutely do not want to indicate the card number, go to the AppStore and find any free access software there. Download and install it on your iPhone. A window will immediately pop up with a proposal to enter under the current account or create a new one. Choose the latter.
- The next steps will be the same, regardless of your attitude towards using the card. You will need to select your country of residence. Here it is recommended to choose Russia, even if you are in the CIS. The fact is that for the Russian-speaking public, the list of applications is more diverse.
- Read the license agreements and accept them.
- Drive in the requested e-mail data, a complex combination of password characters, remember. That it cannot be identical to the login, that is, the ID itself.
- When entering age data, remember that there is an age limit. Thus, the company does not allow persons under 13 years of age to register. Downloading software is possible from the age of 18.
- Provide answers to questions and be sure to write them down on paper so that you can recall if necessary.
- A window will pop up for entering payment data or with the line "No", depending on the previously selected method. Write whatever you need.
- Click on the "Next" element, this step will complete the operation. It remains to proceed to the mailbox. There should be a message from apple asking you to verify your ID. It will also contain a link that you need to follow.

Using iTunes to create an ID
As in the previous method, there are 2 possibilities here - to work with or without a bank card. Choose what you need. And the algorithm of work will be as follows:
- Go to the iTunes menu, and then to the store. But this is when providing a card number. If without this - select any free software for downloading and proceed to the menu through it.
- From this step, everything is normal for both methods. We get into the login field through the current or new account - to choose from. We stop our attention on creating a new ID-number.
- We provide real information about ourselves. If possible, write down the answers and store them in a safe place.
- We drive in the data on the bank card, that is, payment. If you logged in through free software, select "No".
- We find the button for creating ID - numbers from below and click on it.
- We expect messages from the "apple" company to your e-mail and follow the link. Keep in mind that it does not always come with lightning speed, sometimes you need to wait 1-2 minutes. In situations like this, it's a good idea to check the spare box. If you incorrectly indicated at least one character in the main, then the message will come there. Double-check your spam folders and trash. Not always postal workers correctly determine them.
Benefits of having an ID number
As you have already understood, creating an ID is a simple and time-consuming operation. But the result will be excellent. It will be expressed in such pluses as:
1 Access to a variety of software and other products. Other manufacturers of mobile devices cannot boast of something similar. Moreover, most applications are distributed freely, that is, they can be downloaded without any payment. And if you decide to purchase a paid product, its cost is unlikely to exceed 7-10 dollars. Downloading can be done directly from an iPhone via the "cloud" or via a PC / laptop using iTunes. 2 Lots of free iCloud storage. From here at any time you can get any file or perform a backup. It is very convenient that there is an option to create copies on the machine. If you activate it, they will be prepared daily. 3 Ability to activate the iPhone search option. This will protect the device in case of theft, as it will turn it into a useless piece of metal if the rightful owner activates this mode. The option allows you to put a block on the gadget and erase personal photos so that they do not fall into the hands of scammers.
Thus, the ID number is our "passport" in the Apple ecosystem. By purchasing it, we can enjoy all the benefits available there and at the same time provide effective protection for our device.

How to remove Apple ID: choose the best way
There are two options for how to do this:
- Change account information on the account management page.
- Write to support on the company's resource on the network.
The second method is not particularly difficult - you just need to fill out a form on the site. Let's talk about the second one in more detail. To implement it, we need a PC / laptop on any operating system (or any iOS device) and a stable network connection.
Changing registration data is the easiest way to remove an ID. Moreover, you can change the information in any order. For example, it can be an address or any other data. The account is saved.
On a PC, you need to launch iTunes, go to the software store and click on the sign in button.
We go into its settings and drive in the necessary changes in personal data, save them.
Keep in mind that connecting an invalid e-mail to your account will not work, because to confirm the changes you need to follow the link that should come to the e-mail.
The same process can be performed through a resource on the network. To do this, follow the address: http://appleid.apple.com/en/. Enter your username and password characters. After completing these steps, the Apple ID account will be deleted. Is it possible to delete an ID on an iPhone 5 or other device in a different way? Of course, this has already been mentioned above. If it's easier for you, contact support directly.
In general, both creating an Apple ID account and deleting it are standard operations that do not require special knowledge. Even a schoolboy can handle them.


