To be honest, we love to show our photos to relatives, friends and just acquaintances. But it's one thing to run a slideshow using some kind of viewer on your home computer. And if you want to be able to always carry it with you, then there will be problems. It is inconvenient to store a bunch of photos on a flash drive or CD. In addition, others may not have a normal viewer. Therefore, the best option is to issue a slide show as a separate executable file or create a mini-movie.
Having taken care of such a question, I began to look for free programs with which I could complete the task. Of course, you can use commercial software, for example, the same Ahead Nero, but why? It's time to switch to free software. A half-hour Internet search yielded deplorable results. Or Picasa, or six little-known but specialized programs. The choice fell on a product from Google. Moreover, there is a detailed help in Russian.
First of all, we download the viewer program from Google from the page http://picasa.google.ru (the installation file weighs about 10 MB). When you first start the utility will offer to scan your hard drive to find pictures. We agree and wait a few minutes. In the left part of the program window we will get a folder tree (“Library”), on the right – photo thumbnails.
Now let's deal a little with the terminology. You can also run a standard slide show. Collect all files in one folder. Or select the photos in the folder manually by holding Ctrl and selecting them one by one. Then go to the menu “View > Slide Show” (or just press “Ctrl+4”). The slide show will start immediately. The settings are available at the bottom of the screen, just move the mouse arrow to the side. In this case, the slide show will pause, to continue it, press the space bar.
But we need something else. In Picasa, this is called a Movie project, which allows you to create a video file with a .wmv extension. You can mount together not only photos and music for the background, but also video clips. The final file can be shown to friends and acquaintances. Or immediately upload to the popular YouTube service. And now in more detail.
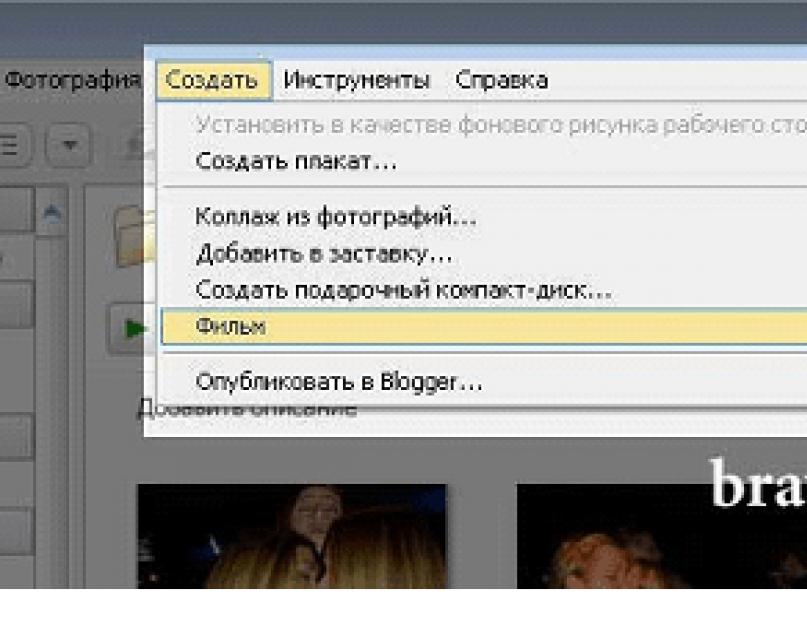
So, we have selected photos, for convenience, copying them into one folder. Open Picasa, find the desired folder in the left list, select it and select the menu “Create > Movie”.
A new window will appear. On the left is the control menu, on the right are frames from the movie of the correct size, on the bottom right is the storyboard of the movie.
If you want the sequence to be sorted by file name or creation date, go back to the “Library” tab, right-click on the folder and select the desired sort “Sort folder by option ...”
Movie tab. This section is responsible for the main parameters of the future film. You can select the audio track for the slides. Alas, only one in WMA or MP3 format. However, a 3-5 minute composition is enough to view dozens of photos. There are three modes to choose from: trim audio, match photo display with sound, or link photos according to sound. By default, the second item is set, i.e. the duration of the display of pictures depends on the total duration of the composition.
Next, you can choose the transition style: there are a total of 10 filters available. This is not much - in some programs there are hundreds of them, but more than enough for an amateur slide film. Too bad you can only choose one style.
Then, depending on the choice of the two previous modes, the duration of the slide show and the “Overlap” parameter are selected.
Now you can move on to choosing the size of the movie. Resolutions are available from 320x240 up to a maximum of 1920x1080.
If necessary, check the boxes "Show captions" and "Crop the full frame of the photo" (to fill the full frame of the movie).
At the very bottom there are three more buttons: “Close”, YouTube” (create a movie and send it there) and “Create movie”. We do not touch them yet and go to another tab.
Slide tab. This section is responsible for the text design of individual slides. You can choose a signature for each. Change the font, size, style, as well as the color of the background and letters. You can also choose a template for the location of the inscriptions. You can assign individual captions to each slide in the storyboard at the bottom right. Also, Picasa automatically creates a zero frame with the name of the folder and the date it was created. This inscription can be changed to something else, for example, “A trip to St. Petersburg. November 2008”. You can add text slides to your movie. And delete unnecessary ones.
Clips tab. Used to add and remove photos, as well as load them from the library (“More” button).
To change the order of photos, you need to drag and drop them manually. You can see what happened by clicking on the green triangle in the storyboard.
Creating the final movie
So, all the settings are done, select “Create Movie”. After a few minutes - the creation time depends on the amount of resolution of the film - it will be created. The movie is automatically saved to a folder like \C:\Documents and Settings\Admin\My Documents\My Pictures\Picasa\Movies\. If you want to return to the project later, click on the “Close” button. And agree to the proposal to save the draft.
That's all. Remember that the quality of a movie does not primarily depend on the number of transition filters used between photos, but on their aesthetic qualities.
(Published in the newspaper "My friend computer", No. 3, February 2009. Here is the author's edition.)
48946 views
Comments |
| error 9 Written by ansenna , at 2010-06-23 21:36:54 also error 9, damn ((( |
| iiiiii Written by iiii , at 2010-12-19 12:54:14 how to download |
| Written by Desmond, at 2011-01-27 17:18:25 hmmm will come in handy |
| Written by TATIANA
, at 2011-02-12 07:15:02 I HAVE COMPOSED EVERYTHING AND MADE THE FILM. I PRESS THE FILM CREATE, THE DRAFT WINDOW COMES OUT AND CREATE NOW, I PRESS CREATE NOW. |
| problemi's picasa 3 Written by vadim , at 2011-05-25 19:14:14 I COMPILED EVERYTHING AND MADE THE FILM. I PRESS THE FILM CREATE, THE DRAFT WINDOW COMES OUT AND CREATE NOW, I PRESS CREATE NOW. |
| change movie in picasa Written by Pauline , at 2012-01-14 21:54:07 Hello, I created a movie from a photo with music, first, in order to view it, I set a small resolution for the photos, today I edited this movie and created another one based on it, the photo resolution is 1600 * 1200. And two problems at once - the new movie freezes when viewed and it does not have a \"change movie\" button, please tell me what is the reason? |
When you open Picasa for the first time, you can choose to scan your hard drive, or just My Pictures, My Documents, or Desktop. The program will display your photos in the Library. You may find photos that you have already forgotten about, because Picasa makes browsing very easy and convenient. If you have photos outside the My Pictures, My Documents, and Desktop directories, then you can add a new folder manually by clicking Tools / Folder Management. The program will display your photos.
Double click on the photo to go to the editing window.
Find out what each button does in the "Normal" editing window. Short guide:
- The first button, "Crop". By clicking on this button, you can cut out part of your image. You can select a size manually, or one of the previously created sizes. Click "Apply" when you're done.
- The second button, "Straighten", can correct the horizontal position of the scenery. Click on it and use the grid and slider until the image is in place. Click "Apply" to save your changes.
- The third button, "Redeye". If you click on it, Picasa will automatically fix the "red" eyes in your photo and display them in green squares. If the program missed someone's eyes, you can hover over this feature's window and Picasa will fix them. If the program selects the wrong object with squares, then you can click on this square so that Picasa ignores this selection. Click "Apply" when you're done!
- The fourth button, "I"m Feeling Lucky", changes the lighting and color of your photo as the program sees fit. This button can be useful for changing blurry or dull photos.
- The fifth button, "Auto Contrast", raises the contrast of your photo to the best level.
- The sixth button, "Auto Color", enhances the color of your photo and works great with dim images.
- The seventh button, "Retouch", can remove dust marks from your photo, which can help if your lens has been dusty. Press the "Retouch" button, and then hover over the cloudy part of your photo, moving your mouse until the blur is removed. Click "Apply" to save your changes.
- The eighth button, "Text", can add text to your photo. Press the button, and then point to any place on the photo to start typing. Use the text box on the left that appears to change the font, size, color, and transparency settings for the text. Click "Apply" to save your changes.
- The ninth and final button, "Fill Light", can light up your photo if it's too dark. Move the slider up and down until the photo is perfectly lit.
Find out what each button does in the "Tuning" tab. This information clarifies the use of the configuration tools:
- The "Fill Light" slider has the same meaning as the last button in the "Basic" edit box. Move it up and down to highlight your photo. Useful when you forget about flash.
- The "Highlights" slider makes the colors of your photo appear brighter and more open. Use when you want to highlight highlights in your photo.
- The "Shadows" slider has the opposite effect of the "Highlights" slider. Use when you want to add shadows to the dark areas of your photo.
- The "Color Temperature" slider changes the "temperature" of your photo. Blue is cold and red is warm. Move the slider to the left if you want more blue, and to the right if you want more red.
- "Neutral Color Picker" removes tint from photos. Click on the eyedropper icon and then on a neutral black, gray or white area of the photo to change the color.
Find out what each button does in the "Effects" tab.
- "Sharpen" - sharpens the edges of your photo. Use when the photo appears blurry and out of focus. Click on "Sharpen" and then move the "Amount" slider until you reach the desired result. Click "Apply" to save your changes.
- "Sepia" - Gives a retro photo a sepia tone.
- "B&W" - Turns your photo into a classic black and white shot.
- "Warmify" - Changes the 'color temperature' to a warmer one.
- "Film grain" - Gives your photo a grainy look. This button, combined with "Sepia" or "B&W", turns a modern photo into a retro shot.
- "Tint" - Changes the photo to the color of your choice. Click on the button and select a color using the eyedropper to apply it to the picture. Next, move the "Color Preservation" slider until you reach the desired result. Click "Apply" to save your changes.
- "Saturation" - increases the saturation of your photo. Click on this option, and move the "Amount" slider to the desired effect. Click "Apply" to save your changes.
- "Soft focus" - Softens the focus around a point of your choice. This tool is useful for highlighting a specific subject in your photo. Click on this option, and move the "Size" and "Amount" sliders until you achieve the desired result. Click "Apply" to save your changes.
- "Glow" - gives a glow to your photo, especially in the light parts of the picture. Click on that and move the "Intensity" and "Radius" sliders until you get the desired result. Click "Apply" to save your changes.
- "Filtered B&W" - makes the photo look like it would be taken with a black and white camera and with a color filter. Click on it and choose a color to use the filter. Click "Apply" to save your changes.
- "Focal B&W" - Makes the photo black and white except for one spot of your choice. Click on it and move the pointer to the desired location. Next, move the "Size" and "Sharpness" sliders until you get the desired result. Click "Apply" to save your changes.
- "Graduated Tint" - enhances the tint of one part of your photo, making it useful when editing photos of the sky. Click on this and choose a color to use the tint. Next, move the "Feather" and "Shade" sliders until you get the desired result. Click "Apply" to save your changes.
- Click "Upload" to upload Picasa Web Albums. This will only work if you have a Picasa account (located here: http://picasaweb.google.com).
- Click on "Email" to send your photos to friends. You can use your default email program, but it will be more difficult to work with from Picasa, or you can use your Gmail account, which will be much easier.
- Click on "Print" to send the selected photos to your printer. Before printing, you can change the settings.
- Click on "Export" to move your photos to another folder on your computer's hard drive. This is useful if you want to copy your photos to a USB or CD.
- Click on "Shop" to shop online. From sites where you can sell your photos to professional printing services.
- Click on "BlogThis" to upload your photos to the Google Blog, if you have one, along with the post.
- Click on "Collage" to create a collage of your chosen photos. You can choose the grid settings and the size of your collage. When you're done, save it and share with your friends!
- Click on "Video" to create a video from the selected photos. You can select an audio track to use with the video, a photo transition style, and the dimensions of your video. By clicking on "Slide" at the top, you can add text to your video. When you're done, you can upload your video to YouTube if you have a YouTube account.
- Click on "Geotag" to add location to your photos using Google Earth. To do this, you will need Google Earth installed on your computer. Wait for Google Earth to open, then move the pointer to the desired position on the globe, and click "Geotag" in the lower right corner of the screen.
Girls kiss at New Year's parties. Soundtrack George Michael "Kissing a Fool".
Would you like to make such a film? It's simple.
We need the Picasa program. You can download this miracle of thought from Google on this page.
Other posts:
- We make a beautiful animated flash album for the site with our own hands
Making a movie in Picasa
In the left part of the program window, select the folder with photos. In the future, the photo can be added or deleted, swapped, and so on.
In the top menu: Create - Movie - From Selected.

On the "Film" tab, add an audio track: Download - select a music file on your computer.

Adding labels. Being on the “Slide” tab, click on the desired frame in the lower right part of the window and set up fonts, background, text output templates, caption or caption content.

I don't think it's hard to figure out the settings. Some of the settings: audio track options, slide duration, video dimensions...

Transition style (I like Shift and Scale Face the best) and so on.

After all the manipulations, click the "Create Movie" button. If there are a lot of photos, then it is created for quite a long time - several minutes.

Picasa, by default, saves new movies to My Documents\My Pictures\Picasa\Movies. You can find it there.
The Picasa movie format is WMV (Windows Media Video). It is better not to upload it to Lira, but you can on YouTube. And right from Picasa - there is even a special button for this.

There is another way to find a file to convert to "lirush" FLV, besides searching in a folder. To do this, go "Back to the Library".
In the left panel we find the folder "Movies" and click on it.

In the central part of the Picasa window, right-click on the desired movie and select "Find on disk".

Here it is, our pretty movie.

Convert video file from WMV format to FLV format
For converting WMV to FLV and more, I use the Format Factory program. At the moment, version 2.60 is relevant, and you can download it at
Picasa: Add name tags and organize photos by people.
Picasa now has built-in face matching technology that makes it easy to add name tags to people in your photos. In addition, you can now add location tags using Google Maps, upload collaborative albums from the Picasa software, and tag photos with ease. Download Picasa 3.6, available in 38 languages, from http://picasa.google.com .
Attention! Unfortunately, almost all the links turned out to be broken due to the overhaul of the sites and Google's instructions. Therefore, you can read it, but information like “More” with a link is not available now, or you need to look for it somewhere in the wilds of Google directories.
The Picasa app, combined with Picasa Web Albums, makes it easy and quick to organize, edit, and upload your photos from your computer to the web. Organize your photos into folders and albums and fix imperfections with Picasa's powerful editing tools. Then use Picasa Web Albums to share your edited photos online and share them with family, friends and the world.
This guide will introduce you to the main features of Picasa. After reading it carefully, go to the Picasa Web Albums guide. You are now ready to become a qualified user of Picasa and Picasa Web Albums.
- Import photos
- Fast and easy editing
- Sharing photos in Picasa
- Photo backup
- Printing photos
- Picasa Photo Viewer
- Organize photos in Picasa

Immediately after installing Picasa, the program scans the folders on your hard drive and displays all the photos it finds in the Picasa Photo Library. You can then create your own albums using photos from various folders. These folders, along with the albums you create, form the photo structure that Picasa then works with. In addition, the icons on the images in the library allow you to see at a glance which photos have been uploaded, which have been marked as favorites, which photos have been geotagged, and more.
Folders
Folders are actual directories on your computer's hard drive where photos are stored. Changes to folders made in Picasa are propagated to the corresponding folders on your computer's hard drive. For example, moving a photo from one folder to another in Picasa is the same as moving a file to a different folder in Windows Explorer.
Albums
Unlike folders, albums only exist in Picasa. For example, you can create an album called "My Grandmother" that contains photos from different folders. Unlike Picasa folders, albums do not correspond to actual folders on your hard drive, so you can delete or move photos from one album to another while leaving the original files in their original locations on your hard drive.
Icons in the library
Picasa displays small icons on the photos in the library, allowing you to immediately determine the status of the image.
Click on an icon to view a brief description of its function:
Synchronized photos
Two circular arrows appear on photos that have Internet Sync turned on. Learn more about Picasa's auto-sync feature.
Tagged photos
Flag indicates a picture that has been marked as a favorite. More.
Geotagged photos
The crosshair indicates photos that have been geo-tagged on Google Earth.
Uploaded photos
An upward green arrow means the photo has been uploaded to Picasa Web Albums. This makes it easy to keep track of photos posted online.
A downward-pointing red arrow indicates that you have manually blocked the photo from uploading. More.
Video files
Import photos

Of course, not all of your photos are stored on your computer. Photos can be imported into Picasa from many sources, including cameras, CDs, memory cards, scanners, webcams, and more.
To upload photos from your camera, follow these simple steps.
- In Picasa, click the Import button.
- Select the desired device or folder from the drop-down menu (usually the camera is detected automatically). Picasa groups images according to when they were taken to make it easier to import photos related to a specific day or event. Each group of images in the import window is marked with a clock icon.
- Choose to import individual photos or all pictures at once. The selected photos will be saved to your computer and displayed in Picasa as a new folder.
Are you using another device? Check out more articles on importing photos into Picasa.
Fast and easy editing
Once you arrange your photos, you can start editing them. Picasa has advanced editing features that allow you to enhance almost any photo, adjust color and lightness, and add effects such as black and white or sepia with one click. Adding captions will create a story with an illustration.
To edit a photo, first double-tap the desired photo. Then find the editing tools located on the left side of the three tabs "Basic. Operations, Edit. and Effects.
Don't worry: Picasa never overwrites the original file. Changes you make to a photo are only viewable in Picasa until you choose to export or save them. In any case, the original photos remain safe and sound and are available at any time. .
Main tab operations"
Main tab The operation is for making simple changes to photos. Select one of the basic operation buttons below to view a brief description of its function:

framing
The "Crop" button allows you to crop unwanted parts of the photo. For example, you can cut out your ex-girlfriend from vacation photos. In addition to the automatic crop sizes offered by Picasa, several others are available.
alignment
Photos taken with a poorly adjusted camera can be straightened. Use the slider to align the photo with the grid.
Red eyes
This tool automatically corrects red-eye that Picasa detects in any supported photo type.
I'm lucky!
This button allows you to change the photo with one click. Google PhotoLab adjusts the color and contrast of an image to make it perfect. Changes will only be noticeable if the photo previously had the wrong color balance.
Auto Contrast
Automatically sets optimal levels of brightness and contrast while maintaining color vibrancy.
Auto color correction
Automatically corrects color deviations and restores color balance while maintaining contrast and brightness settings.
retouching
With this tool, you can remove defects and improve the quality of photos. You can even process old photos with spots, water stains and scratches.
Text
Easily and quickly add text over pictures. You can change the style, size, and angle of the text, as well as drag it to any area of the photo.
Evening lightening
Sometimes photographs with a bright background appear obscured or indistinct. Using the slider, you can add light to the foreground of the photo and make the photo more balanced.
Edit tab
Allows you to control the color and lightness of a photo, which enhances the look of the image.
Select the lighten or change color magic wand tool to let Picasa automatically adjust the photo, or use the sliders to manually adjust the photo's lightness and color settings.
- Fill ColorSometimes photos with bright backgrounds appear obscured or blurry. Add an equalizing dodge to the foreground of your photos to make them more balanced.
- Lighten Increase the lightness level to bring out the highlights in your photo more. This will bring out the shades of white in your composition.
- Shadows Darken the shadows in a photo to increase its depth or contrast. Use this feature in combination with the Lightenness slider to increase the contrast of a faded photo.
- Color TemperatureAdd warm tones to your photo by moving the slider to the right. This will brighten the colors and bring the composition to life.
- Neutral ColorTell Picasa which parts of the photo are considered gray or white. This will help Picasa PhotoLab when balancing the color of the photo.
Effects tab
The Effects tab contains 12 effects that can be applied to any photo. For more information about each of the effects, click one of the buttons below:
Definition
Makes the outlines of objects sharper and less blurry.
Sepia
Create a retro effect by changing the colors of an image to reddish-brown.
black and white
Convert any color photo to black and white.
Tones are warmer
Adds warmth to the tones of "cold" photographs, improving the display of skin tones. Additional manual control helps implement the Color Temperature slider on the Edit...
Grain
Adding "grain" to a photo to improve its appearance when printed.
Another shade
Removing a color from a photo and applying the selected tint over the resulting image. The Color Preservation slider allows you to add the original colors of the photo under the added tint.
Saturation
This slider allows you to adjust the saturation of the color. Move the slider all the way to the left to make the photo black and white. Move the slider all the way to the right so that the image becomes "radioactive".
soft focus
Creates a "blurred" area around the selected point.
Shine
Increase the brightness of the white areas of photos to achieve a hazy effect.
Black and white filter
Creates the effect of shooting a black and white photo with a color filter. The filter blocks or enhances certain colors in a photo.
black and white focus
Makes the photo black and white, leaving one circular area in color. You can set the size and sharpness of the color spot.
Tone selection
Apply a graduated filter based on the selected color. This allows you to make the gray sky blue.
Adding signatures
Captions tell the story of the photo. When editing a photo, click on the line "Create a caption for a photo" and add a caption. After uploading photos to Picasa Web Albums, captions will also appear in online albums.
You can use the search bar at the top of the Picasa window to search for captions. Captions make it easy to find the photos you need.
Synchronization of changes
How do I make recent changes made in Picasa apply to photos on the web? Enabling the Sync Online feature for a folder or album allows you to immediately transfer changes in Picasa to Picasa Web Albums on the web. In addition to changes to photos, you can also sync changes to captions, tags, and geotags. Learn more about syncing photos online.
In addition, many online album settings can be managed directly from Picasa.
Dropdown menu to the right of the button
Sharing allows you to control the privacy of web albums, the size of online pictures, and more. Learn more about the various web settings controls.
Sharing photos in Picasa
This will allow you to upload your photos to Picasa Web Albums. This will prompt you to email invitations to your friends and family to view the album.
Click the button below to view the feature description:
Clearing the Featured Photos area
This button removes all photos from the Featured Photos area. Similarly, to remove a specific photo from the featured area, select it and click the Remove button. As a result, the selected photo will be removed from the group.
Leaving photos in the featured area
The Selected Photos area displays the photos you have selected in Picasa. To select multiple images, hold down the Ctrl key while clicking on photos in the library. The Select button allows you to keep photos from various folders and albums.
Add photos to a new or existing album
The Add To button allows you to add all selected photos from the Featured Photos area directly to the album of your choice. Learn more about adding photos to the Featured Photos area.
Picasa allows you to upload up to four photos directly to Blogger at a time. More.
Create a photo collage
Sending photos by email
This button allows you to quickly send multiple photos to family and friends by choosing any provider. More.
Export copies of photos
This button allows you to create copies of photos with all the changes made to them. The original photos will remain intact. During export, you can also set the size and quality of the resulting photo copies. More.
Geotagging photos in Google Earth
Place your photos on a map in Google Earth and add latitude and longitude information to the photo file. More.
Making a movie
Combine your photos, video files and music into a movie and upload it directly to YouTube. More.
Print photos at home
The Print button allows you to print the selected photos to a local or network printer. Select a paper size and orientation, such as 4 x 6 or wallet size, and Picasa will automatically resize the selected photos to match the specified aspect ratio. You can select and add a frame or captions you created earlier to your photo. Print layout options make it easy to print multiple photos on one page.
Rotate photos
Rotate the photo 90 degrees clockwise or counterclockwise.
Online print order
Click this button for a list of Picasa online photo printing service providers. After registering on the provider's website, Picasa will automatically upload all the photos you have selected to their site, allowing you to order prints of the photos of your choice.
Marking favorite photos
Tag photos in Picasa to mark them as favorites. The Flag filter at the top of the Library lets you see only your favorite photos.
Tagging photos
Tags are like keywords. One or more word Picasa tags make it easy to find photos in a collection. To save time, use the keyboard shortcut Ctrl-T.
Download all photos from the Featured Photos area. During the download, you can manage the size of the download, manage the privacy of your online albums, and even add watermarks to the downloaded photos. In addition to the upload button, there are a number of other ways to upload photos from Picasa to Picasa Web Albums. More.
Photo backup

Backup is a reliable way to keep your photos safe and sound. With Picasa it's very easy. Simply open the Tools menu, select Photo Backups, and then New Folders and Shortcuts.
External hard drive: Users with a large collection of photos can save the backup file to an external hard drive to free up space on their local hard drive. After the first backup of the entire collection, Picasa will only save the latest changes made. This saves time and guarantees the protection of the entire collection. Using an external drive to save backups to Picasa is also a great way to transfer photos to another computer.
Backup to CD or DVD: Burning photos to CD or DVD is an equally convenient option. Even if your hard drive fails or is damaged due to a power surge, you can always recover all your photos and the changes you made to them.
Printing photos
In the era of digital imaging, it is sometimes nice to see and hold a printed photograph in your hands. Picasa makes it easy to print photos at home or order prints online from a print service provider of your choice.
The Print button allows you to print the selected photos to a local or network printer. You can select the paper size and orientation, such as 4 x 6 or wallet size, and Picasa will automatically resize the selected photos according to the specified aspect ratio. In this case, you can add a frame or captions to the photo. Print layout options make it easy to print multiple photos on one page.
Click the Order button for a list of Internet Print Service Providers. After registering on the provider's website, Picasa will automatically upload all the photos you have selected to their site, allowing you to order prints of the photos of your choice.
Picasa Photo Viewer
Want to quickly view a photo? Picasa Photo Viewer is installed with Picasa and allows you to view your photos on your desktop or in Windows Explorer. This small application allows you to view images, make minor changes to them, and upload them to Picasa Web Albums without fully launching Picasa. You can set Picasa Photo Viewer as the default viewer for all photo file types supported by Picasa.
© Just stupidly copied from Google Help
If you find an error, please highlight a piece of text and click Ctrl+Enter.
The beginning of autumn is the time to sort out summer photos, and at the same time organize the family photo archive. Over the years, millions of users have used the free Picasa program to do this. But this year, you may have to reconsider your habits - starting May 1, Picasa is no longer available for download. The popular program suffered the same fate as previously Google Reader, and now its support has been discontinued. You can only work with Picasa if you have downloaded it before, but keep in mind that no updates will be released for it anymore.
It would seem that there is something, but there are enough programs for organizing photos on the market, both paid and free. But despite the huge selection of applications for working with images, finding a full-fledged replacement for Picasa is not so easy. Mainly because, for all its simplicity, this program was multifunctional: with its help it was possible to organize photos into albums, and select pictures according to various criteria, and perform basic editing operations, and quickly upload albums to the cloud.
Let's not forget that Picasa was a free solution, which means that commercial programs should not be considered as an alternative. We also deliberately do not include in this review programs whose main function is to view images. Our goal is to find solutions that allow you to organize large collections of pictures and upload photos to the Internet.
⇡ "Google Photos" - successor to Picasa
For backing up your photo archive to the cloud, there's hardly a better solution than Picasa's successor, Google Photos.

First, all web albums downloaded using Picasa are automatically transferred to the new service from Google. Secondly, as in the case of Picasa, users of the new service receive unlimited space for storing photos, the size of which does not exceed 16 megapixels. For most people who use their smartphones to take pictures, this means that the entire photo archive can be downloaded for free, because the number of smartphones with better cameras is not so large (even the iPhone 6s has a 12-megapixel camera, and the Samsung Galaxy S6 has a 16-megapixel camera).
To upload photos to the cloud from a computer, you need to use the Google Photo Backup application. Like Picasa, it allows you to automatically download all photos from memory cards, from the desktop, and from standard Windows folders for storing pictures. In addition, you can add any number of additional folders in which photos are stored.

When automatically copying photos to the cloud from memory cards, you can also select the folder where a local copy of the images will be saved. Google Photos Backup can download images at their original resolution or automatically compress them. RAW files are supported, but their loading is disabled by default (this can be changed in the settings).

If everything is more or less clear with uploading images online, then many other Picasa functions in Google Photos have not migrated. The online service has rather modest image editing capabilities (and, frankly, the editor's interface leaves much to be desired), there are no tags, captions and comments to photos familiar to Picasa users. Therefore, if you have used Picasa not only as a tool for uploading photos online, but also as a cataloger and editor, in addition to Google Photos, you should look for a desktop application with the desired functionality.
⇡ BonAView 1.9.0
- Developer: High Motion Software
- Operating system: Windows
- Distribution: Free
- Russian interface: yes
BonAView is not the most famous program for working with photo archives, but it is undeservedly overlooked. In terms of functionality, it is close to Picasa, and in some ways even surpasses the recently closed program.

Viewing images is possible by catalogs, by albums, or in the Timeline mode, so beloved by Picasa users, when photos are automatically sorted by the program by the time they were taken.

Ratings can be used to sort images, and custom albums can also be created. BonAView is suitable for working with photo collections of any size, as it supports an unlimited number of albums (including any number of nested albums). The number of photos in each album is also not limited.
You can use filters to sort images. They help to display only photos related to a particular album, having a certain name or a given rating.
Viewing photos is possible in two modes: in the form of thumbnails, the size of which can be easily controlled using a special slider, and in 3D view. The second mode allows you to work with the "carousel" of pictures, rotating and even editing them in the course of viewing.

By the way, about editing. There are a lot of functions for enhancing photos in BonAView. There are options for adjusting color reproduction, level correction and red-eye removal, tools for automatic adjustment, tools for sharpening and blurring, about a dozen effects (sepia, negative, shadow, etc.), a good set of frames for different occasions. It is interesting that, as in "large" photo editors, there is an opportunity to apply editing tools not to the entire image, but to its part, having previously selected the required fragment.

It is also worth paying attention to an interesting feature for creating visual annotations. Using it, you can add various graphic elements and text to the picture.
We also mention the excellent built-in search engine. BonAView can search for photos in specified folders, in user albums, by certain properties (size, resolution or file type, last modified date, rating).
To quickly select photos stored in different folders and albums, it is convenient to use the ImageBoard tool (analogue of Photo Tray in Picasa). Once photos are placed on the ImageBoard, they can be added to albums and other operations as a group. But there are no full-fledged tools for batch processing in BonAView - for this, the same developer offers a separate ImBatch program.
Unfortunately, BonAView does not contain any means for sharing photos with other people. Perhaps this is due to the fact that the latest version of the program is dated 2013, when social functions were not as in demand as they are now. However, BonAView can be used in conjunction with Google Photo Backup.
⇡ JetPhoto Studio 4.15
- Developer: Atomix Technologies Limited
- Operating system: Windows/Mac
- Distribution: Free for non-commercial use (pro version available)
- Russian interface: no
JetPhoto Studio combines the capabilities of a cataloger, viewer, graphic editor, and also contains tools for publishing photo albums on the Internet.

To start working with the program, you need to create an album. Then photos are added to the album from various sources (from a memory card, from local folders, from a webcam, etc.). By sorting the images in the album, the user can mark them with an asterisk, add keywords and notes (that is, a text description of the photo). It is also possible to edit information in EXIF. All this data can be used when searching for the desired pictures. And pictures marked with an asterisk can be quickly highlighted. It is convenient to use the calendar to search for photos. Just click on the desired date and only pictures taken on that day will be shown.

In addition to the usual mode for such applications to view photos in the form of thumbnails, JetPhoto Studio offers an interesting opportunity to display images on the map. The program perfectly understands geotags and makes it possible to assign them both manually and on the basis of a loaded GPS track. It also provides integration with Google Earth, the creation of files KML and KMZ. If data about where the photo was taken is not automatically available, it can be easily added by simply entering the location on the map. This can also be done for a group of photographs, having previously selected them.

JetPhoto Studio offers many different ways to conveniently view images. For example, based on the selected photos, you can create a wallpaper, flash gallery, screensaver, slideshow, web gallery in one of several formats.

But the image editing capabilities are more than modest. There are only a couple of the most basic effects, tools for basic image correction and cropping.
Like Picasa, this program allows you to not only work with photos locally, but also publish them on the Internet. There are two main ways to do this: using the Flickr service and the JetPhoto Server. The second way involves creating your own website with web albums based on the templates provided. The user needs to purchase hosting, deploy JetPhoto Server on it, and then upload web albums from the program to the site. Agree that for the majority this is too complicated and expensive (especially since we are looking for an alternative to Picasa, which means free solutions).
But integration with Flickr is very interesting, because on this photo hosting you can store photos with a total volume of up to 1 terabyte. In order to be able to upload your photos to Flickr, you need to authorize JetPhoto Studio to access your account. After that, you can upload both entire albums and selected photos. At the same time, you can upload originals or compress images to a specified size, manage privacy settings, add geotags. Keywords and notes added to photos in JetPhoto Studio will also be transferred to Flickr. For the convenience of users, the amount of available free space is shown before each download.

Among the shortcomings of JetPhoto Studio, it is worth noting a not very responsive interface. The program often "thinks" when performing some operations, and importing photos with default settings generally paralyzes the computer. True, if you switch to import in the background, you can work with other applications. In an age when even many web applications can simultaneously load data and respond perfectly to any user action, this looks like archaism. However, JetPhoto Studio is in a sense a relic of the past, because the latest version of the program is dated 2013.
⇡ WindowsphotoGallery ("Photo Album") 2012
- Developer: Microsoft
- Operating system: Windows 7, Windows 8 and Windows 8.1
- Distribution: Free
- Russian interface: yes
Perhaps someone will consider the Microsoft application not the best alternative to the Google product, but Windows Photo Gallery is very close to Picasa in terms of functionality. The application can be downloaded for free as part of the Windows Essentials package ("Windows Essentials"). In addition to the component we are interested in, the package also includes a blog editor, a mail application, OneDrive, and a program for working with video files. During installation, you can select only those applications that should be installed.

Immediately after launch, Photo Gallery picks up all the photos stored in the image library (by default, these are the My Pictures and Public Pictures folders). To add other images, you just need to show the program where they are stored by changing the library settings.

If you need to overwrite photos from a memory card, just connect the drive - the program will immediately offer to import pictures.
In the Photo Gallery window, photos are sorted by the time they were taken. At the same time, as in Picasa, photos stored in different folders can be nearby. Their location on the disks does not matter. If you wish, you can choose one of many other sorting options: by folders, by rating, by drive types, by people shown in photos, by name, by geotags. The appearance of the application workspace is highly customizable: you can enable the display of additional information about the file, rating, signatures, quickly change the sort order, etc.

A variety of means are offered for organizing images: rating, flags, captions, text tags, geotags, information about the people present in the photos. It is convenient to use the sidebar to add tags of different types. In the course of work in the program, the user compiles a database of tags, and later you can quickly find photos tagged with a certain keyword, or those in which the right people are present. Interestingly, Photo Gallery can help with the identification of people: the program itself finds the heroes of the photographs and offers to indicate who they are.
All photo information added to Photo Gallery can later be used in searches. For example, you can search for pictures taken in certain months and tagged with a particular tag. The AND and OR operators are used to define search criteria. The search criteria can also be the file type (video, photo, raw file) and whether it has been published on the web.

Photo Gallery allows you to send photos and videos by mail, as well as upload to various online services: Flickr, OneDrive, Facebook, YouTube, Vimeo. Images can be compressed to the desired size before uploading. In addition to sending to the Internet, photos can be used to create panoramas, collages, videos (in the Movie Maker application).

You can also find some image editing tools in the Photo Gallery. There are several filters with a handy preview function, tools for color correction and noise removal, exposure adjustment and photo alignment. In addition, directly from the program, you can rename files, change the resolution, edit information about the shooting date. It is convenient that all the changes made can be canceled by pressing one button.
Unfortunately, support for Photo Gallery for Windows 7 will soon be discontinued. This is because Windows 8.1 and Windows 10 have a built-in Photos app for viewing, organizing, and sharing photos online. This application allows you to view photos in different modes: by albums, by folders or by date. Photos is integrated with OneDrive, and all the photos that the user interacts with in the application can be uploaded to the cloud. Albums are created automatically based on the best images or manually by the user. However, in terms of functionality, Photos is inferior to Photo Gallery (as well as Google Photos is inferior to Picasa - simplification is now in vogue).
⇡ Zoner Photo Studio Free 18
- Developer: Zoner, Inc.
- Operating system: Windows
- Distribution: Free
- Russian interface: yes
We deliberately placed Zoner Photo Studio at the end of the review, leaving this app for dessert. Despite the fact that the program is the little brother of the professional version of Zoner Photo Studio, it has all the modern important functions for organizing your photo archive, as well as free uploading to your own photo hosting. It differs from the paid version of Zoner Photo Studio Free in that it lacks advanced image editing tools: masks, filters, gradients, selection tools, noise removal, adding frames, perspective correction, working with HDR, and screen capture tools. , batch processing, creating video slideshows. However, the list of what the program has is much longer than the list of missing options.

Zoner Photo Studio Free can work both as a simple tool for viewing photos stored on disk or on any media, and as a cataloger. In order to create a database of photographs, you need to import them into the program from any folder, from a memory card, etc. Photos stored in the database can be displayed as a calendar, by folders or by keywords. There are a lot of viewing modes: from one in which the main part of the window is occupied by one image, to “tiles” (with the ability to flexibly adjust the size of thumbnails). In addition, you can display multiple photos side by side, and view geotagged photos on the map.
Image sorting is also great: photos can be sorted by title, rating, date created or last modified. There are also a huge number of advanced criteria that use all EXIF data. In addition, the program can display RAW and JPEG images separately, giving preference to either the first or the second.

To the right of the viewing area, there is an information panel where you can easily edit all the information about a photo. So, it is possible to set a color label, add a rating, title, description, keywords, change EXIF information.
Zoner Photo Studio Free does not work with third-party cloud services, but offers unlimited photo storage space on Zonerama's own photo hosting. After creating an account and a gallery, a Zonerama item appears in the navigation bar with two folders: Shared Albums and Hidden Albums. It is easy to guess that all photos sent to the first one become public, and pictures uploaded to the second folder can only be viewed by the owner. To upload photos, simply select them and move them to the desired album with the mouse.

Although the editing options are limited compared to the professional version of Zoner Photo Studio, for a free program, their range is quite impressive. You can not only change the image resolution and canvas size, but also add text, place one image on top of another, add some effects, perform color correction, improve sharpness, work with shutter speed and white balance.
⇡ Conclusion
In general, as our little research has shown, most of the free programs that can be considered as a worthy alternative to Picasa have one common drawback: they are quite old. Therefore, we still need to think about whether it is worth switching to an unfamiliar solution or staying on the abandoned, but still working Picasa for a while. The only program that stands out from the rest in that it is actively developed and looks modern is Zoner Photo Studio Free. She, apparently, can be recommended as the best replacement for Picasa.


